Is your laptop’s performance suffering as it struggles to handle multiple Chrome tabs? Are you frustrated that the laptop you want to buy with higher RAM is out of your budget? Don’t worry, we have a potential solution for you.
While these issues may seem unrelated, they’re actually connected. Insufficient RAM is a major cause of slowdowns in modern laptops. When a laptop lacks enough physical memory, it starts swapping data to slower storage options like hard drives or solid-state drives, resulting in reduced transfer rates and overall sluggishness.
Fortunately, adding more RAM can provide the performance boost you need. In this guide, we will walk you through the process of upgrading and installing RAM in your laptop, which is surprisingly easy.
Upgrade and Install Laptop RAM: A Step-by-Step Guide
Our guide covers everything you need to know about upgrading your laptop’s RAM, from determining if your laptop supports upgradable RAM slots to the actual physical installation process. Although the DIY nature of the process might initially seem intimidating, we assure you it’s no more challenging than assembling a Lego block set. To navigate directly to a specific section of interest, you can use the table below.
Things Remember Before Installing RAM
Before we begin, there are a few prerequisites to keep in mind. First, you must ascertain whether your laptop genuinely requires additional RAM. While low RAM can contribute to computer slowdowns, other factors like storage issues may also be responsible, especially if you’re using an older laptop.
Over time, hard drives can degrade, leading to slower data read speeds. Additionally, it’s crucial to evaluate whether your workload actually demands more RAM. Upgrading RAM won’t solve performance issues unrelated to memory shortage, so it’s essential to identify the root cause accurately.
To ensure a smooth installation process and optimum results, follow these steps before installing a new RAM kit:
Check for Available RAM Slots
Begin by determining if your laptop has dedicated slots for RAM installation. Many modern thin and light laptops come with soldered RAM directly connected to the motherboard, making it impossible to remove or replace without specialized tools.
You can quickly find out if your laptop supports upgradable RAM by searching for your laptop model online. Alternatively, you can use the following methods to check for available RAM slots on Windows:
- Open the Task Manager by pressing the Windows 11 keyboard shortcut “Ctrl + Shift + Esc.” Go to the “Performance” tab to see how many physical memory slots are currently in use. This information will help you determine the number of available slots.
- If you’re unsure about whether your laptop has soldered RAM, you can use third-party software. We recommend using Crucial’s System Scanner, an easy-to-use tool that reads your motherboard’s details and provides comprehensive information about your laptop’s memory configuration. Simply follow these steps:
- Click on the provided link, which will redirect you to Crucial’s website.
- On the website, click on “Start Your Free Scan.”
- Allow the download prompt and install the software.
- Open the “CrucialScan.exe” file, which will display your laptop’s memory specifications, including the number of available slots and maximum supported memory.
Determine RAM Type and Speed
Once you’ve confirmed that your laptop has an empty RAM slot or non-soldered RAM, you need to identify the RAM type and speed. Follow these steps:
- Download CPU-Z (Free), a third-party software, on your Windows laptop. Click on the “Setup •English” button to initiate the download.
- Install CPU-Z using the downloaded setup file, then open the software and navigate to the “Memory” tab in the top navigation bar. Here, you’ll find crucial details about the memory supported by your laptop, including:
- RAM Type (e.g., DDR4)
- DRAM Frequency (base clock speed, double the base frequency for DDR)
- CL Latency (RAM timings for your laptop’s module)
- Keep these three details in mind (RAM type, frequency, and timings) when purchasing a new RAM kit for your laptop.
Tools Required for RAM Upgrade
Now that you have the necessary information about your laptop’s RAM, let’s move on to the tools required to complete the upgrade. These tools will not only facilitate the process but also make it easier for you. Here’s what you’ll need:
- A screwdriver set with a regular Philips head (and Torx for certain Ultrabooks).
- A plastic pick to help you safely pry open your laptop’s back panel (not always necessary, as most back panels are easily removable).
How to Install or Upgrade RAM in Your Laptop
Now it’s time for the most critical step: physically installing the new RAM stick. Follow these instructions to successfully upgrade or install RAM in your laptop:
- Locate and unscrew the back panel screws. In our case (MSI Modern 14), there were 7 standard Philips screw heads.
- Use the screwdriver to unscrew the screws one by one. Once all the screws are removed, gently insert a plastic pick or card between the panels and lift them up. You should hear a pop sound in most cases.
- Continue prying the joints until you have successfully loosened all sides. The back panel will now be removable, as shown in the provided image.
- If you encounter difficulty removing the back panel, it indicates the presence of additional clips holding it down. However, once the panel opens, you’ll see the setup resembling the image below. Our memory module was covered by a thin metallic heat spreader, which we lifted to access the RAM stick. If you have a similar setup, removing the heat spreader won’t impact memory performance.
- With access to the existing memory modules, release the side clips holding them in place and remove the RAM module from the slot.
- In our case, we’ll be installing a 4GB DDR4 module to bring the total RAM to 12 GB. Note: If you’re only adding an additional RAM stick, you’re essentially upgrading your memory. If you want to replace the entire memory, remove the existing RAM stick from the socket before proceeding.
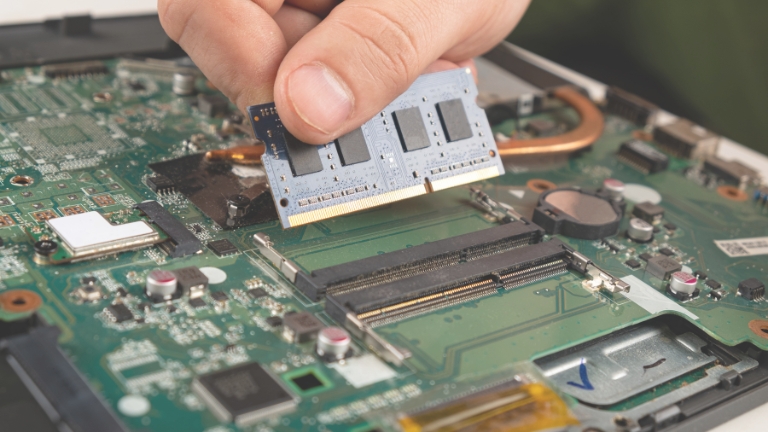
- Align the new RAM stick with the groove in the RAM slot and insert it slowly at a 45-degree angle. Once inserted, push it down firmly until you hear a click.
- Now that the new memory stick is installed, close the back panel by following the reverse order of the previous steps. Align the panel and press it down on all sides until it clicks into place. Then, secure the screws in their respective positions and tighten them.
Verify Proper Installation of Laptop RAM
After upgrading or installing a new RAM stick in your laptop, it’s essential to check if the installation was successful. If you encounter any issues during the installation process, you’ll notice them immediately. As we discussed in our dedicated motherboard article, RAM plays a fundamental role in the boot process.
If the system detects no RAM, it won’t start. In case your laptop fails to boot, repeat the above steps and ensure that the new RAM sticks are correctly seated in their sockets.
If the boot process is successful, you need to verify whether your laptop is detecting the additional memory you installed. Follow the same steps mentioned earlier and open the Task Manager in Windows 11 to check the amount of RAM consumed and the number of slots in use.
Conclusion
In conclusion, upgrading and installing RAM in your laptop is a relatively straightforward process that can significantly improve your laptop’s performance. By adding more RAM, you can enhance multitasking capabilities, reduce lag, and improve overall system responsiveness.
However, before proceeding with the upgrade, it’s important to ensure that your laptop supports upgradable RAM and determine the correct RAM type and speed required. Upgrading your laptop’s RAM can be a cost-effective way to boost performance and extend the lifespan of your device.
With a little time and effort, you can enjoy smoother multitasking, faster load times, and an overall improved computing experience.